Call to book your own Wig Styling Workshop
with Sharon Guli today! 970-221-4854
How to Style and Wear Your
River Crossing Victorian Wig
Victorian, Spiral Cascade,
Gibson, Saloon styles
By Miss Tabitha, SASS Regulator #26972
With special thanks to Peaches O’Day, SASS #68389
As published in
The Cowboy Chronicle™
Many ladies have realized no matter how diligently they work
to make their Victorian outfits look authentic, they will
fail to achieve the “stepped from a history book” look as
long as they sport a modern hairstyle. To help solve this
problem, many of you have followed the historic practice of
supplementing with hairpieces or full wigs. This article
will focus on a few simple suggestions on styling a wig.
While my instructions and illustrations will feature the
wigs I sell, many of these tips can be applied to other
brands.
A Few Opening Guidelines
#1 – Don’t fear the wig!
My wigs are easy to work with, very forgiving, and will
surprise you with how lovely they can look with a few pins
and your own creativity. If all your attempts fail,
remember you can always bring it to a professional
hairstylist for redemption.
#2 – Don’t use heat!
No matter how much they look like it, my wigs (and many
others sold at SASS events) are NOT made of human hair. If
you want spiral curls, you can use a wig styling gel or
mousse, sponge or stick rollers, or even just the practiced
use of a wig hairbrush in the right direction with some
finger teasing to get beautiful results.
#3 – Use plenty of pins, and style on a Styrofoam or wig
styling head form.
If you place your wig on a substitute head, you can pin the
dickens out of it without fear of penetrating your own
skull.
#4 – After styling, pin securely to your head!
There’s no graceful way for a gentleman to pick up your wig
from the ballroom floor or wooden sidewalk if your hair
unexpectedly leaves your head. I will share tips on my
personal pinning techniques later in this article.
Items I use: the wig (obviously), a narrow wig styling
comb/pick, plenty of small bobby pins, corsage or “T” pins
to secure wig to styling head, a small seamstress pin magnet
to hold the bobby pins while I work, a wig styling or
Styrofoam head, a clamp or stand to hold the wig head, and
wig hairspray.
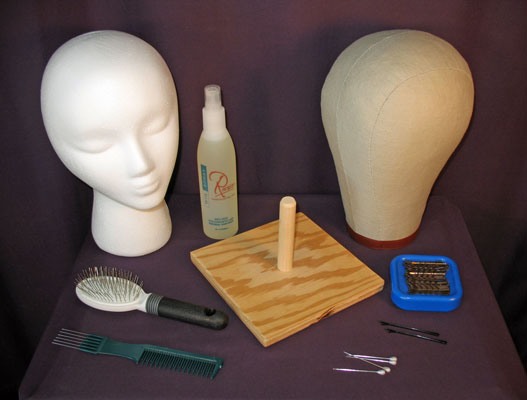
Styling Tools, clockwise from top left: Styrofoam
head, wig hairspray, head stand, wig styling head,
magnet with bobby pins, large anchor bobby pins,
corsage pins, wig pick/comb, wig brush.
Styling Tips for a “Gibson” Updo
-
Remove packaging net from wig and shake gently. Using
styling pick, lightly and briefly fluff the wig. Place
the wig on your own head and adjust the Velcro strips on
the inside to ensure a comfortable fit. When satisfied,
remove wig.
-
Using corsage pins, secure the wig to the styling head
in several places. If using a Styrofoam head, I suggest
stretching the cap slightly when pinning it to the head,
since these forms are usually smaller than the average
human head. Make sure it is on straight and no curls
are tucked up underneath. Clamp the head to the table
or otherwise secure.
-
Beginning at center back on the crown, separate out a
1-2” segment of hair. Using the pick, lightly fluff the
ends, and with the comb, gently smooth the underside of
the segment.
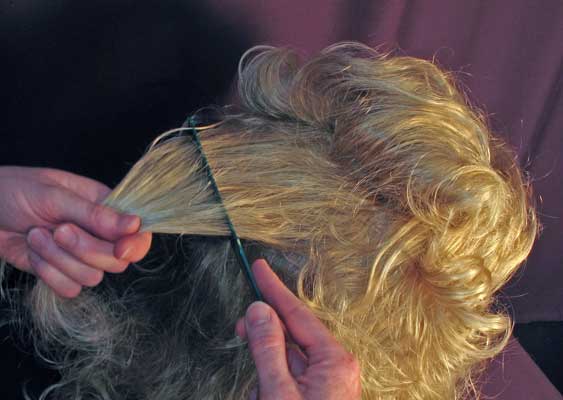 Step 3. Combing a lock of hair from the underside.
-
Pushing the curls on top of the head out of the way with
one hand, lightly and loosely fold the segment forward.
Secure with two of the small bobby pins, sliding one
from the right and one from the left, so they lay
parallel to each other horizontally and “lock” the hair
into place (NOT criss-crossed). Be sure to dig the pins
deeply through the hair and through the cap of the wig
itself.
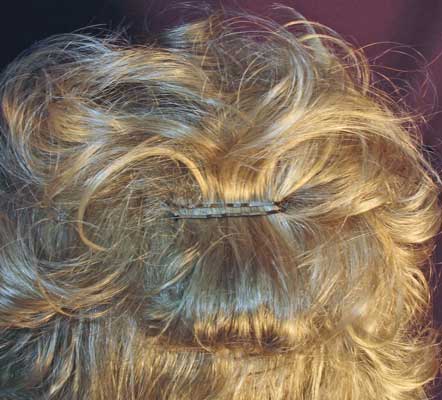 Step 4. Pinning a segment of hair forward, using two
horizontally placed bobby pins from opposite directions.
Step 4. Pinning a segment of hair forward, using two
horizontally placed bobby pins from opposite directions.
-
Continue this process, moving around the head, one
segment at a time, pulling the loose curls up toward the
crown of the head, taking special care at the temples,
and being sure not to pull the segments up too tightly.
Leave several delicate strands hanging by the face if
desired. Use plenty of bobby pins.
 Step 5. Wig styling halfway completed
-
After all the segments are pinned up, fluff the curls on
top of the head, and smooth the sides and back with the
comb by combing upward. Use extra pins to secure long
locks if they dangle too much. Use a light mist of wig
hairspray to hold everything in place (regular hairspray
can be used, but I prefer wig care products, since they
are specially formulated for wig fibers).
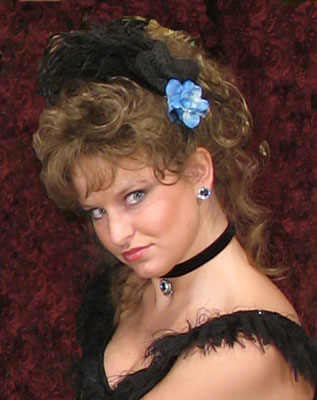
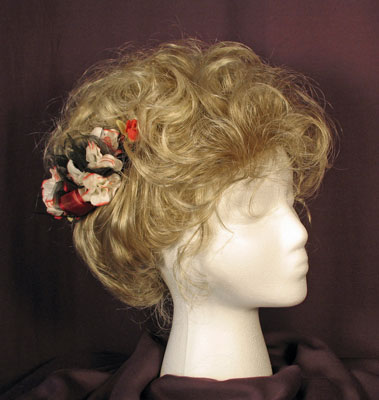 Finished “Gibson” style.
Suggestions for Additional Styles and Tips
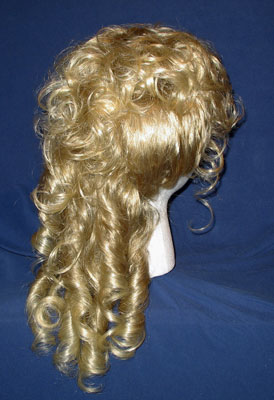
For a cascade style, pull up a couple of segments from the
sides only and leave the back long and wavy. For spiral
cascades, pull all the segments up from the sides only,
creating a “Mohawk” of the curls on top of the head and
running down toward the back. Then, using the wig brush,
you can “spiral” the long curls hanging down the back by
twirling the brush around the locks, after determining which
direction the curls naturally want to go.
Finished “Gibson” style.
Suggestions for Additional Styles and Tips
For a cascade style, pull up a couple of segments from the
sides only and leave the back long and wavy. For spiral
cascades, pull all the segments up from the sides only,
creating a “Mohawk” of the curls on top of the head and
running down toward the back. Then, using the wig brush,
you can “spiral” the long curls hanging down the back by
twirling the brush around the locks, after determining which
direction the curls naturally want to go.
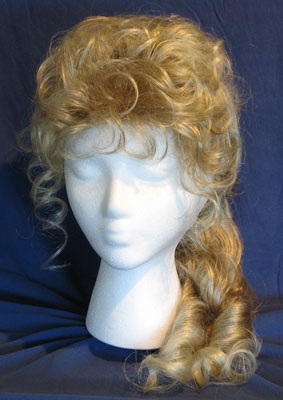
 Spiral cascade style. Pull up sides only, and then twirl
wig brush around long back locks to create spiral curls.
Spiral cascade style. Pull up sides only, and then twirl
wig brush around long back locks to create spiral curls.
 A high ponytail with long dangles of curls creates a Saloon
style wig for Kitty Darling.
Pulling the hair up into a high ponytail and fluffing the
curls will give you an easy updo, too. I’ve seen ladies
create a chignon (a bun), French twists, and many other
intricate styles. Use your imagination and get gutsy. If
you don’t like the results, you can always unpin it and
start over.
Trim bangs if desired, but remember to take it easy since
they won’t grow back. Pull some of your own bangs into the
blend if they match. If your own hair is long enough and
matches the color of the wig, a clever trick is to bring
some of your own hair up into the wig, especially at the
temples, after placing it on your head. If you curl the
long ends and pin to blend, people can be completely fooled
it’s not all your own hair.
When I have little loose long bits come free (wispies), I
pull them all the way down at the back and trim them with
scissors to about one inch long. With time, this creates a
charming little “fringe” at the nape of the neck which helps
hide the wig cap anyway.
After the styling process is completed, store the styled wig
on a Styrofoam head, and use it and remove it time and time
again without having to completely redo the “do.”
A high ponytail with long dangles of curls creates a Saloon
style wig for Kitty Darling.
Pulling the hair up into a high ponytail and fluffing the
curls will give you an easy updo, too. I’ve seen ladies
create a chignon (a bun), French twists, and many other
intricate styles. Use your imagination and get gutsy. If
you don’t like the results, you can always unpin it and
start over.
Trim bangs if desired, but remember to take it easy since
they won’t grow back. Pull some of your own bangs into the
blend if they match. If your own hair is long enough and
matches the color of the wig, a clever trick is to bring
some of your own hair up into the wig, especially at the
temples, after placing it on your head. If you curl the
long ends and pin to blend, people can be completely fooled
it’s not all your own hair.
When I have little loose long bits come free (wispies), I
pull them all the way down at the back and trim them with
scissors to about one inch long. With time, this creates a
charming little “fringe” at the nape of the neck which helps
hide the wig cap anyway.
After the styling process is completed, store the styled wig
on a Styrofoam head, and use it and remove it time and time
again without having to completely redo the “do.”
Pinning the Wig to your Head
-
I highly recommend wearing a fishnet wig cap under your
wig. It keeps your own hair out of the way, keeps the
wig itself cleaner, and gives you a base for pinning the
wig securely to your own head.
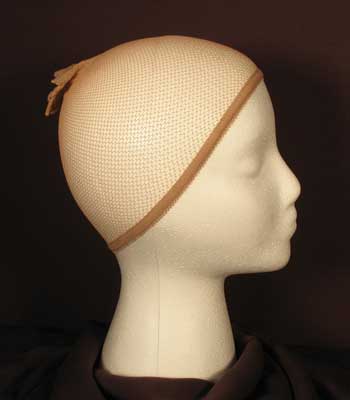 Fishnet wig cap
-
Remove the wig from the styling or storage head.
Grasping the wig with one hand at the front and one at
the back (thumbs to the inside), place the front of the
wig at the natural hairline on your forehead, and gently
stretch and lift the wig onto your head.
-
Straighten the wig into proper position. Pull out any
curls trapped underneath. Don’t worry about how messy
it might look at this point.
-
Using bobby pins, slide in several around your head
close to your scalp, being sure to catch both the cap of
the wig itself and the fishnet wig cap. I recommend one
bobby pin at each upper “corner” of your forehead, one
at each temple, and one on each side of the nape of your
neck.
-
The clincher – take two large bobby pins, the kind your
mother used to use to hold in her hair rollers. On each
side of your head, up high and under the mass of curls,
sink one deeply all the way to your scalp, and then
fluff the hair to hide them. These are your anchor
pins, and will keep your wig on your head in spite of
wind, rain, and vigorous waltzes.
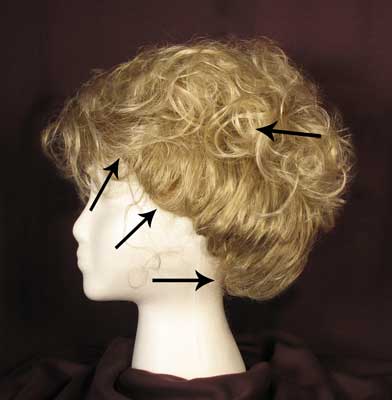
Steps 4 and 5. To secure the wig to your head, the
arrows show suggested placement of small bobby pins
around perimeter of head and large anchor bobby pins
on top of style under curls.
-
Take the pick and lightly fluff and smooth your style.
Without much effort, it will quickly behave itself.
-
At the end of day, remove the perimeter pins, and have
hubby or a friend, if available, search for and remove
the anchor pins. Gently peel the wig off of your head
and lay upside down to air overnight.
Storing and Traveling with your Wig
After airing overnight, I prefer to store my wig pinned to a
Styrofoam head. To keep the dust off and for easy
transport, you can purchase one of those clear plastic
containers designed for file storage. I place a few plastic
bags in the bottom and lay the head face down. When I
remove the head, it may have a rectangular shape, but this
is quickly resolved with use of the pick. Some Styrofoam
heads may need 1-2” trimmed off the bottom of the neck to
make everything fit more comfortably in the plastic
container.
When packing for air travel, I have often packed my wigs in
those plastic bags you get from shopping. I place one
puffed bag into the wig, carefully place the wig upside down
into another, gently squeeze out the air and tie off the
top, and tuck the whole unit in a safe corner of my
suitcase. After arrival, I place the wig on my head as
usual, pin, smooth, and fluff until happy.
Maintaining and Caring for your Wig
I suggest instead of re-styling one wig over and over,
consider investing in several wigs. I have one done up
Gibson-style, one in an 1870’s cascade, and two more in
different colors I wear long for cowgirl and saloon
outfits. I just grab the one I want and pop it on.
If you styled the wig on a styling head and really dug the
pins deeply and securely into the cap of the wig itself, you
shouldn’t have to re-do the “do” very often (barring an
especially windy day or excessive twirl on the dance
floor).
If you have brushed your wig often, and the curls have
relaxed, you can get back a lot of the natural permanent
curl by spritzing with water and lightly “scrunching” (don’t
rub) with your hands while it dries.
Fake hair does not absorb sweat and body oils like human
hair, so if you consistently wear your wig with a wig cap,
go easy on the hairspray, and let it air well between
wearings, you should not often have to wash the wig.
Frankly, I occasionally lightly sniff the inside of mine and
wash it only when I know it needs it. Of course, how often
you wear your wigs in windy or sweaty situations will
determine how often you wish to wash or re-style your wig.
If you do want to clean your wig, remove all the pins,
gently brush out the snarls, and swish in cool or lukewarm
water in your sink with a wig or gentle shampoo. Again, I
recommend using wig care products as they are formulated for
synthetic hair over human hair. Rinse thoroughly, and
squeeze the wig gently in a towel to remove the excess
water. Do not wring, rub, or twist when wet, or you may
frizz the fibers. Let dry flat or loosely set on a
Styrofoam head. Spritzing with a little wig conditioner
when damp can add shine and manageability. Occasional
“scrunching” with your hands while drying will encourage the
natural curl to spring back.
There you go. Have fun, be brave, get creative, and give it
a whirl. It’s always delightful to see a lady go from
modern to Victorian in front of my eyes, and surprise her
husband in the process!
© 2011 Sharon Guli of River Crossing, Inc. and The Cowboy
Chronicle™
For further advice, call 970-221-4854, send an email to
sguli@guliproductions.com
or visit her website at
www.rivercrossinginc.com.
Miss Tabitha, a.k.a. Sharon Guli, is an active shooter, clothing historian,
entertainer, and vendor at major SASS events with her
husband, Mad Mountain Mike, SASS Life/Regulator #4385.
Click
here to visit River Crossing's Victorian Wig Page